ESP8266 D1 R2 WiFi Processor with Uno Footprint
วิธีการต่ออุปกรณ์ สอนใช้งาน WeMos D1 ESP8266 WiFi เริ่มต้นใช้งาน ติดตั้งโปรแกรม Arduino IDE 1.เชื่อมต่ออุปกรณ์ตามด้านล่างWeMos D1 ESP8266 WiFi -> Micro USB -> Computer 2. ดาวน์โหลดโปรแกรม Arduino IDE จาก https://www.arduino.cc/en/Main/OldSoftwareReleases#previous 3. เลือกลิ้งค์ดาวน์โหลดให้ตรงกับระบบปฏิบัติการของเครื่องคอมพิวเตอร์ที่ใช้ โดยในที่นี้จะใช้ระบบปฏิบัติการ Windows เป็นตัวอย่าง และสำหรับระบบปฏิบัติการ Windows นี้จะมีลิ้งค์ดาวน์โหลดอยู่ 2 ลิ้งค์ โดยแต่ละลิ้งค์ก็จะเป็นไฟล์ที่แตกต่างกัน คือ– Windows จะเป็นการดาวน์โหลดไฟล์ .zip ที่เมื่อทำการแยกไฟล์ออกมาแล้วจะสามารถใช้งานโปรแกรม Arduino IDE ได้ทันทีโดยไม่ต้องทำการติดตั้ง– Windows Installer จะเป็นการดาวน์โหลดไฟล์ .exe สำหรับติดตั้งโปรแกรม Arduino IDE ด้วยตัวเองความแตกต่างระหว่างไฟล์ทั้ง 2 คือ1. การดาวน์โหลดแบบ Windows จะใช้เวลาในการดาวน์โหลดนานกว่าแต่จะไม่เสียเวลาในการติดตั้งโปรแกรมใหม่2. การติดตั้งโปรแกรมด้วยตัวเองนั้นจะมี USB Driver ให้ด้วยในกรณีที่คอมพิวเตอร์ที่ต้องการติดตั้งโปรแกรมนั้นยังไม่มี USB Driver 4….
WiFiClientSecureAxTLS.h: No such file or directory
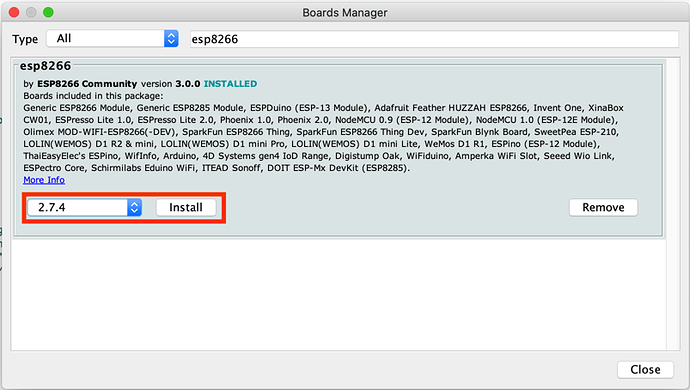
I recommend to install the ESP8266 v.2.7.4 package version which is known to work well. You can do this in the Arduino Board manager > Search “esp8266” > select v.2.7.4 > install: -CH340 (ใช้ใน Arduino Compatible, NodeMCUV3, Wemos D1 mini)…
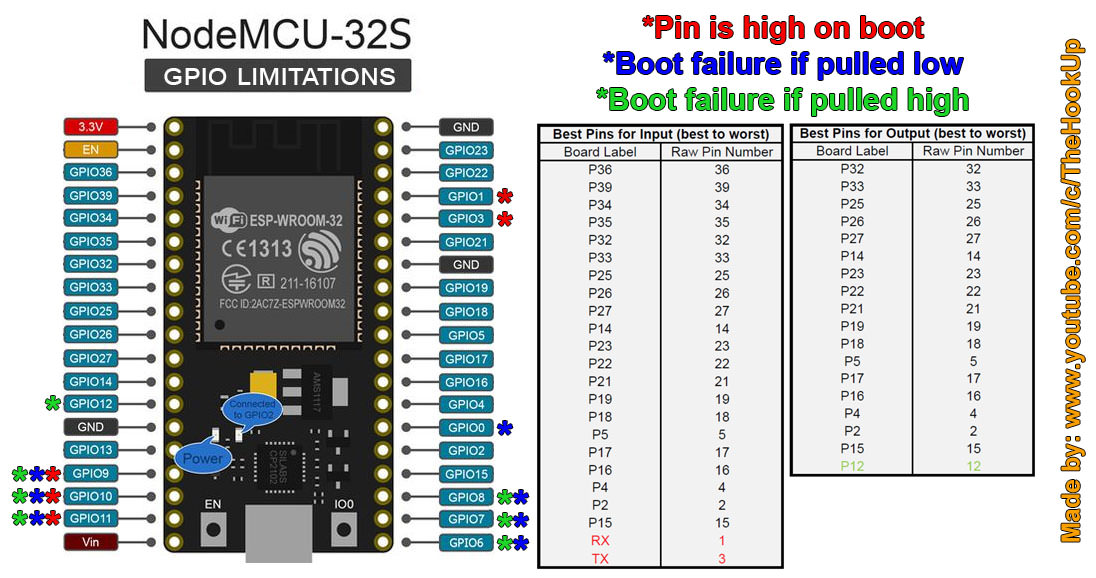
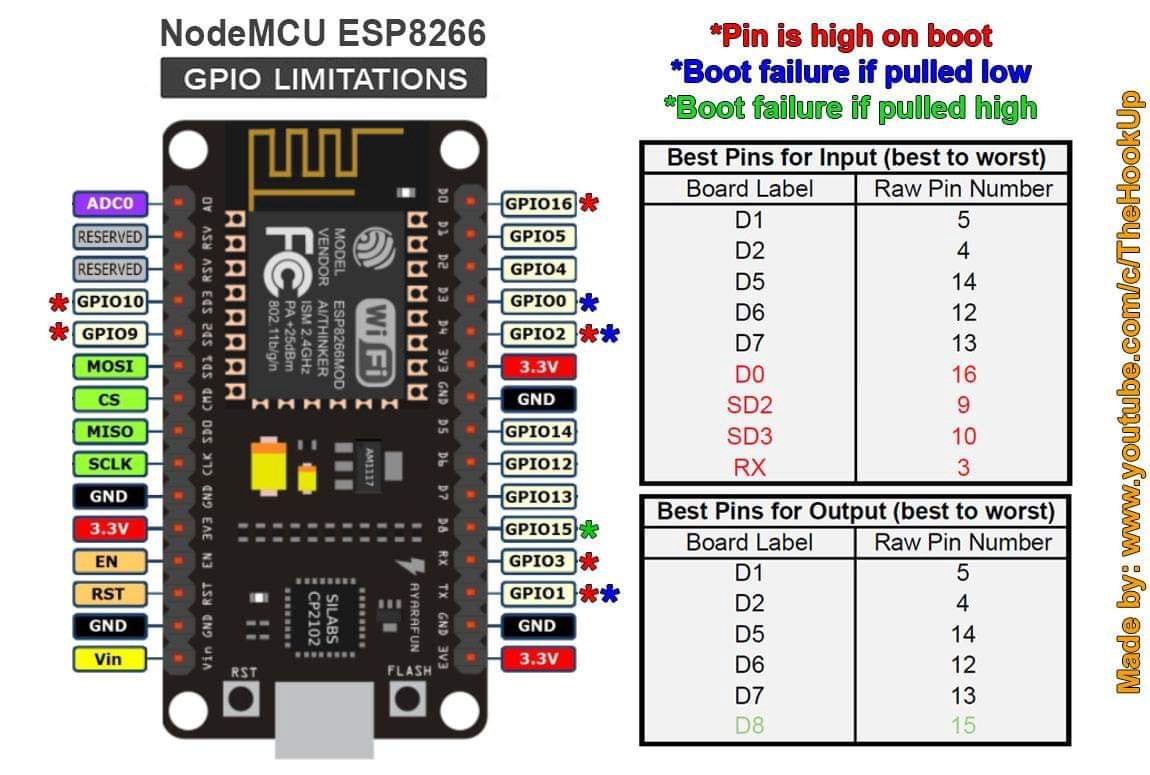
การใช้งานขา GPIO ESP8266 NodeMCU แบบ Digital
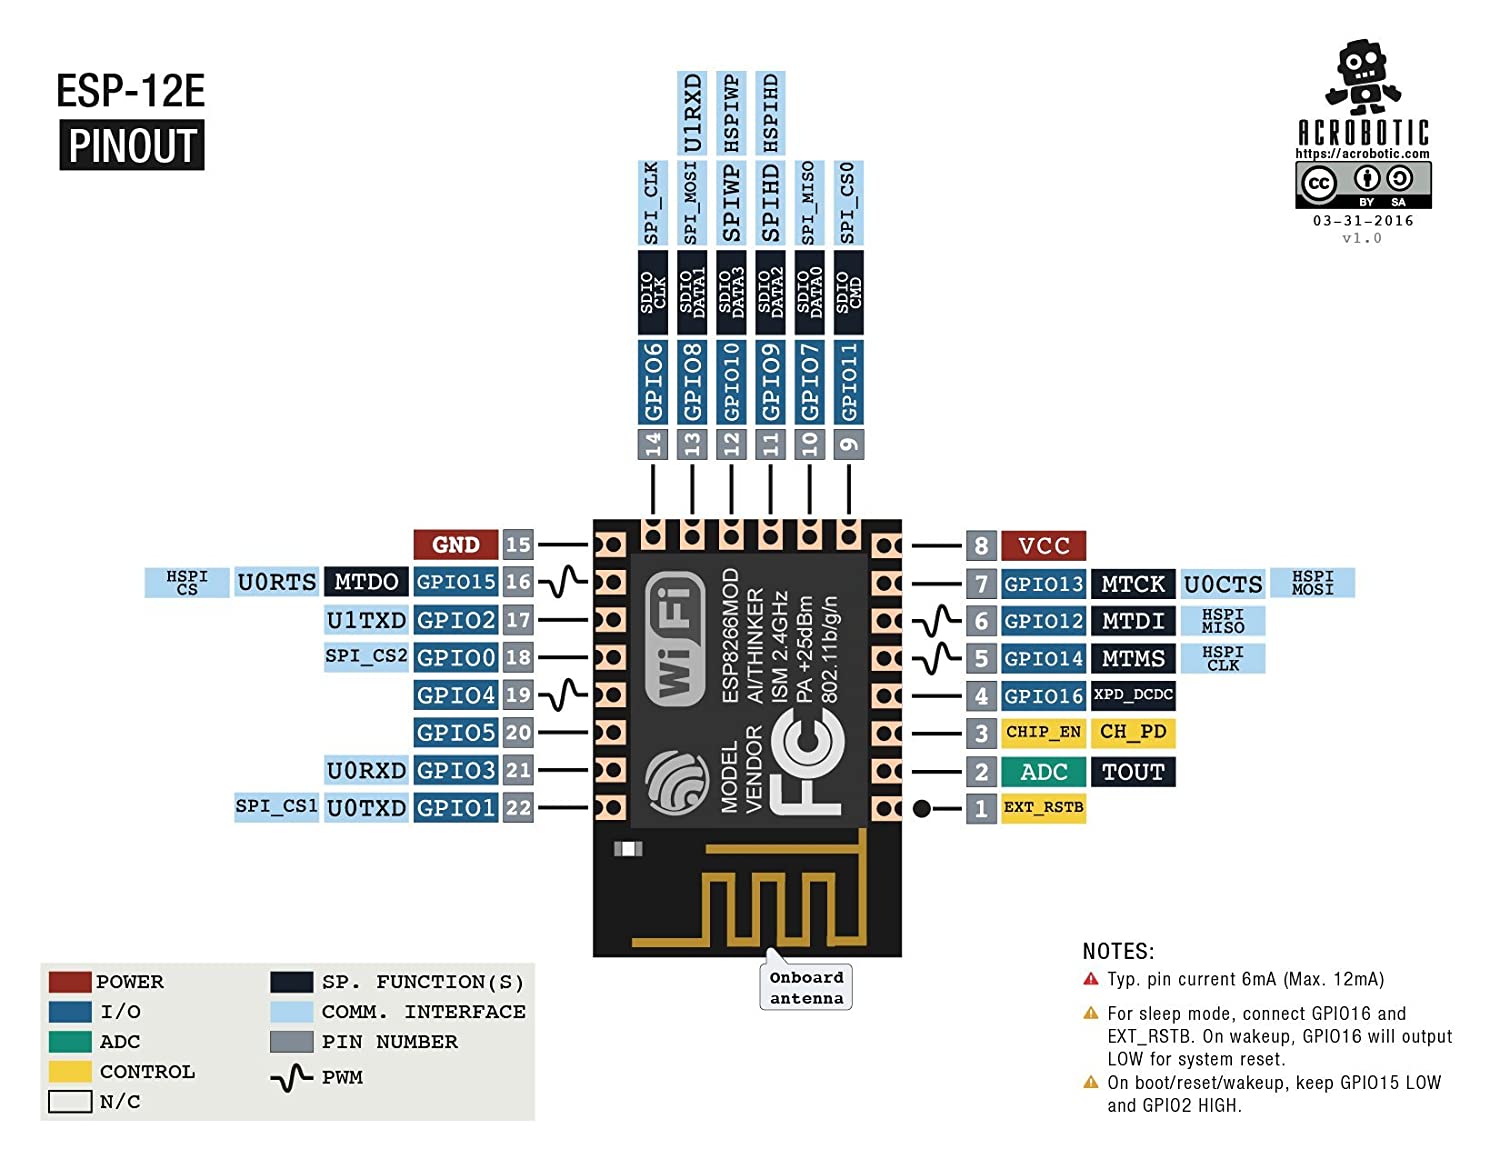
ESP8266 NodeMCU การใช้งานขา GPIO แบบ Digital ขา GPIO ของ ESP8266 สามารถสั่งงาน ควบคุมเอาต์พุต และอ่านค่าอินพุตแบบดิจิตอลได้ โดยขาที่เป็น Digital จะขึ้นต้นด้วยตัว D หรือเรียกเป็นตัวเลขได้ การจัดขาของ NodeMCU เป็นดังรูปด้านล่าง โดยขา D0-D10 เรียกใช้งานได้ตามชื่อที่เขียนบนบอร์ด หรืออ้างอิงเป็นตัวเลขก็ได้ เช่น D4 = 2 (GPIO2 เรียกแทนเลขสอง) NodeMCU GPIO มีการ map ขาดังนี้ ESP8266 NodeMCU Digital Writeตัวอย่างการใช้งานควบคุมเอาต์พุตที่ขาดิจิตอล…
ESP8266 NodeMCU Relay Module – Control AC Appliances
Using a relay with the ESP8266 is a great way to control AC household appliances remotely. This tutorial explains how to control a relay module with the ESP8266 NodeMCU. We’ll take a look at how a relay module works, how…
Interface DHT11 DHT22 w/ ESP8266 NodeMCU Using Web Server
Have you ever wanted to have sensors scattered all around your house and garden reporting their temperature regularly to a central server? Then, this IoT project might be the solid launching point for you! This project uses ESP8266 NodeMCU as…
Installing ESP8266 Board in Arduino IDE (Windows, Mac OS X, Linux)
The ESP8266 community created an add-on for the Arduino IDE that allows you to program the ESP8266 using the Arduino IDE and its programming language. This tutorial shows how to install the ESP8266 board in Arduino IDE whether you’re using…
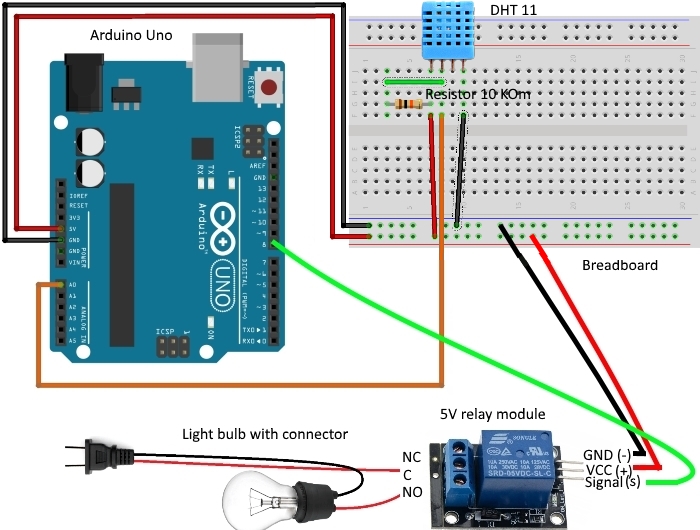
Project 011d 5V relay and DHT 11 21 22 sensor – Humidity or Temperature controlled relay
Basics: Project 011d Project name: 5V relay and DHT 11 21 22 sensor – Humidity or Temperature controlled relay Tags: Arduino, Arduino Uno, DHT11 21 22, Humidity and temperature module, 5V relay, Humidity controlled relay, Temperature controlled relay Attachments: libraries1, library2 and sketch WARNING – THIS PROJECT INVOLVES HIGH VOLTAGES…

