In this project you’ll create a standalone web server with an ESP8266 that displays the temperature and humidity with a DHT11 or DHT22 sensor using the Arduino IDE. The web server you’ll build can be accessed with any device that has a browser on your local network.

Throughout this tutorial we’ll show how to build two different web servers:
- Web Server #1: Asynchronous web server that updates the temperature and humidity automatically without the need to refresh the web page and with custom CSS to style the web page.
- Web Server #2: Simple HTTP web server that displays the latest sensor readings when the page is updated in a raw HTML page.
Recommended resources:
- How to Install the ESP8266 Board in Arduino IDE
- ESP8266 Web Server
- ESP8266 Boards Comparison
- DHT11/DHT22 Humidity and Temperature Sensor with Arduino
- ESP8266 Pinout: Ultimate GPIOs Guide
Learn more about the ESP8266 with our course: Home Automation using ESP8266.
Parts Required

To build this project, you need the following parts:
- ESP8266 development board (read ESP8266 development boards comparison)
- DHT22 or DHT11 Temperature and Humidity Sensor
- 4.7k Ohm Resistor
- Breadboard
- Jumper wires
ESP8266 and DHT11/DHT22 Schematic Diagram
Before proceeding with the tutorial, wire the DHT11 or DHT22 temperature and humidity sensor to the ESP8266 as shown in the following schematic diagram.

In this example, we’re wiring the DHT data pin to GPIO5 (D1), but you can use any other suitable GPIO. Read our ESP8266 GPIO Reference Guide to learn more about the ESP8266 GPIOs.
If you’re using an ESP-01, GPIO 2 is the most suitable pin to connect to the DHT data pin, as shown in the next diagram.

Installing the DHT Library for ESP8266
To read from the DHT sensor, we’ll use the DHT library from Adafruit. To use this library you also need to install the Adafruit Unified Sensor library. Follow the next steps to install those libraries.
1. Open your Arduino IDE and go to Sketch > Include Library > Manage Libraries. The Library Manager should open.
2. Search for “DHT” on the Search box and install the DHT library from Adafruit.

3. After installing the DHT library from Adafruit, type “Adafruit Unified Sensor” in the search box. Scroll all the way down to find the library and install it.

After installing the libraries, restart your Arduino IDE.
1. ESP8266 Asynchronous Web Server
To build the web server we’ll use the ESPAsyncWebServer library that provides an easy way to build an asynchronous web server. Building an asynchronous web server has several advantages. We recommend taking a quick look at the library documentation on its GitHub page.
Installing the ESPAsyncWebServer library
The ESPAsyncWebServer library is not available to install in the Arduino IDE Library Manager. So, you need to install it manually.
Follow the next steps to install the ESPAsyncWebServer library:
- Click here to download the ESPAsyncWebServer library. You should have a .zip folder in your Downloads folder
- Unzip the .zip folder and you should get ESPAsyncWebServer-master folder
- Rename your folder from
ESPAsyncWebServer-masterto ESPAsyncWebServer - Move the ESPAsyncWebServer folder to your Arduino IDE installation libraries folder
Installing the ESPAsync TCP Library
The ESPAsyncWebServer library requires the ESPAsyncTCP library to work. Follow the next steps to install that library:
- Click here to download the ESPAsyncTCP library. You should have a .zip folder in your Downloads folder
- Unzip the .zip folder and you should get ESPAsyncTCP-master folder
- Rename your folder from
ESPAsyncTCP-masterto ESPAsyncTCP - Move the ESPAsyncTCP folder to your Arduino IDE installation libraries folder
- Finally, re-open your Arduino IDE
Code
We’ll program the ESP8266 using Arduino IDE, so you must have the ESP8266 add-on installed in your Arduino IDE. If you haven’t, follow the next tutorial first:
Open your Arduino IDE and copy the following code.
/*********
Rui Santos
Complete project details at https://randomnerdtutorials.com/esp8266-dht11dht22-temperature-and-humidity-web-server-with-arduino-ide/
*********/
// Import required libraries
#include <Arduino.h>
#include <ESP8266WiFi.h>
#include <Hash.h>
#include <ESPAsyncTCP.h>
#include <ESPAsyncWebServer.h>
#include <Adafruit_Sensor.h>
#include <DHT.h>
// Replace with your network credentials
const char* ssid = "REPLACE_WITH_YOUR_SSID";
const char* password = "REPLACE_WITH_YOUR_PASSWORD";
#define DHTPIN 5 // Digital pin connected to the DHT sensor
// Uncomment the type of sensor in use:
//#define DHTTYPE DHT11 // DHT 11
#define DHTTYPE DHT22 // DHT 22 (AM2302)
//#define DHTTYPE DHT21 // DHT 21 (AM2301)
DHT dht(DHTPIN, DHTTYPE);
// current temperature & humidity, updated in loop()
float t = 0.0;
float h = 0.0;
// Create AsyncWebServer object on port 80
AsyncWebServer server(80);
// Generally, you should use "unsigned long" for variables that hold time
// The value will quickly become too large for an int to store
unsigned long previousMillis = 0; // will store last time DHT was updated
// Updates DHT readings every 10 seconds
const long interval = 10000;
const char index_html[] PROGMEM = R"rawliteral(
<!DOCTYPE HTML><html>
<head>
<meta name="viewport" content="width=device-width, initial-scale=1">
<link rel="stylesheet" href="https://use.fontawesome.com/releases/v5.7.2/css/all.css" integrity="sha384-fnmOCqbTlWIlj8LyTjo7mOUStjsKC4pOpQbqyi7RrhN7udi9RwhKkMHpvLbHG9Sr" crossorigin="anonymous">
<style>
html {
font-family: Arial;
display: inline-block;
margin: 0px auto;
text-align: center;
}
h2 { font-size: 3.0rem; }
p { font-size: 3.0rem; }
.units { font-size: 1.2rem; }
.dht-labels{
font-size: 1.5rem;
vertical-align:middle;
padding-bottom: 15px;
}
</style>
</head>
<body>
<h2>ESP8266 DHT Server</h2>
<p>
<i class="fas fa-thermometer-half" style="color:#059e8a;"></i>
<span class="dht-labels">Temperature</span>
<span id="temperature">%TEMPERATURE%</span>
<sup class="units">°C</sup>
</p>
<p>
<i class="fas fa-tint" style="color:#00add6;"></i>
<span class="dht-labels">Humidity</span>
<span id="humidity">%HUMIDITY%</span>
<sup class="units">%</sup>
</p>
</body>
<script>
setInterval(function ( ) {
var xhttp = new XMLHttpRequest();
xhttp.onreadystatechange = function() {
if (this.readyState == 4 && this.status == 200) {
document.getElementById("temperature").innerHTML = this.responseText;
}
};
xhttp.open("GET", "/temperature", true);
xhttp.send();
}, 10000 ) ;
setInterval(function ( ) {
var xhttp = new XMLHttpRequest();
xhttp.onreadystatechange = function() {
if (this.readyState == 4 && this.status == 200) {
document.getElementById("humidity").innerHTML = this.responseText;
}
};
xhttp.open("GET", "/humidity", true);
xhttp.send();
}, 10000 ) ;
</script>
</html>)rawliteral";
// Replaces placeholder with DHT values
String processor(const String& var){
//Serial.println(var);
if(var == "TEMPERATURE"){
return String(t);
}
else if(var == "HUMIDITY"){
return String(h);
}
return String();
}
void setup(){
// Serial port for debugging purposes
Serial.begin(115200);
dht.begin();
// Connect to Wi-Fi
WiFi.begin(ssid, password);
Serial.println("Connecting to WiFi");
while (WiFi.status() != WL_CONNECTED) {
delay(1000);
Serial.println(".");
}
// Print ESP8266 Local IP Address
Serial.println(WiFi.localIP());
// Route for root / web page
server.on("/", HTTP_GET, [](AsyncWebServerRequest *request){
request->send_P(200, "text/html", index_html, processor);
});
server.on("/temperature", HTTP_GET, [](AsyncWebServerRequest *request){
request->send_P(200, "text/plain", String(t).c_str());
});
server.on("/humidity", HTTP_GET, [](AsyncWebServerRequest *request){
request->send_P(200, "text/plain", String(h).c_str());
});
// Start server
server.begin();
}
void loop(){
unsigned long currentMillis = millis();
if (currentMillis - previousMillis >= interval) {
// save the last time you updated the DHT values
previousMillis = currentMillis;
// Read temperature as Celsius (the default)
float newT = dht.readTemperature();
// Read temperature as Fahrenheit (isFahrenheit = true)
//float newT = dht.readTemperature(true);
// if temperature read failed, don't change t value
if (isnan(newT)) {
Serial.println("Failed to read from DHT sensor!");
}
else {
t = newT;
Serial.println(t);
}
// Read Humidity
float newH = dht.readHumidity();
// if humidity read failed, don't change h value
if (isnan(newH)) {
Serial.println("Failed to read from DHT sensor!");
}
else {
h = newH;
Serial.println(h);
}
}
}Insert your network credentials in the following variables and the code will work straight away.
const char* ssid = "REPLACE_WITH_YOUR_SSID";
const char* password = "REPLACE_WITH_YOUR_PASSWORD";How the Code Works
In the following paragraphs we’ll explain how the code works. Keep reading if you want to learn more or jump to the Demonstration section to see the final result.
Importing libraries
First, import the required libraries.
#include <Arduino.h>
#include <ESP8266WiFi.h>
#include <Hash.h>
#include <ESPAsyncTCP.h>
#include <ESPAsyncWebServer.h>
#include <Adafruit_Sensor.h>
#include <DHT.h>
Setting your network credentials
Insert your network credentials in the following variables, so that the ESP8266 can connect to your local network.
const char* ssid = "REPLACE_WITH_YOUR_SSID";
const char* password = "REPLACE_WITH_YOUR_PASSWORD";
Variables definition
Define the GPIO that the DHT data pin is connected to. In this case, it’s connected to GPIO5 (D1).
#define DHTPIN 5 // Digital pin connected to the DHT sensorThen, select the DHT sensor type you’re using. In our example, we’re using the DHT22. If you’re using another type, you just need to uncomment your sensor and comment all the others.
#define DHTTYPE DHT22 // DHT 22 (AM2302)Instantiate a DHTobject with the type and pin defined earlier.
DHT dht(DHTPIN, DHTTYPE);Create an AsyncWebServerobject on port 80.
AsyncWebServer server(80);Create float variables to hold the current temperature and humidity values. The temperature and humidity are updated in the loop().
float t = 0.0;
float h = 0.0;
Create timer variables needed to update the temperature readings every 10 seconds.
unsigned long previousMillis = 0;    // will store last time DHT was updated

// Updates DHT readings every 10 seconds
const long interval = 10000;
Building the Web Page
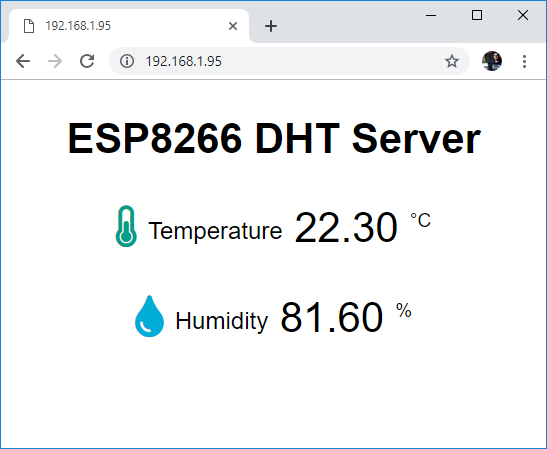
Proceeding to the web server page.

As you can see in the above figure, the web page shows one heading and two paragraphs. There is a paragraph to display the temperature and another to display the humidity. There are also two icons to style the page.
Let’s see how this web page is created.
All the HTML text with styles included is stored in the index_html variable. Now we’ll go through the HTML text and see what each part does.
The following <meta> tag makes your web page responsive in any browser.
<meta name="viewport" content="width=device-width, initial-scale=1">The <link> tag is needed to load the icons from the fontawesome website.
<link rel="stylesheet" href="https://use.fontawesome.com/releases/v5.7.2/css/all.css" integrity="sha384-fnmOCqbTlWIlj8LyTjo7mOUStjsKC4pOpQbqyi7RrhN7udi9RwhKkMHpvLbHG9Sr" crossorigin="anonymous">
Styles
Between the <style></style> tags, we add some CSS to style the web page.
<style>
 html {
   font-family: Arial;
   display: inline-block;
   margin: 0px auto;
   text-align: center;
  }
  h2 { font-size: 3.0rem; }
  p { font-size: 3.0rem; }
  .units { font-size: 1.2rem; }
  .dht-labels{
    font-size: 1.5rem;
    vertical-align:middle;
    padding-bottom: 15px;
  }
</style>
Basically, we’re setting the HTML page to display the text with Arial font in block without margin, and aligned at the center.
html {
  font-family: Arial;
  display: inline-block;
  margin: 0px auto;
  text-align: center;
}
We set the font size for the heading (h2), paragraph (p) and the units(.units) of the readings.
h2 { font-size: 3.0rem; }
p { font-size: 3.0rem; }
.units { font-size: 1.2rem; }
The labels for the readings are styled as shown below:
dht-labels{
  font-size: 1.5rem;
  vertical-align:middle;
  padding-bottom: 15px;
}
All of the previous tags should go between the <head> and </head> tags. These tags are used to include content that is not directly visible to the user, like the <meta> , the <link> tags, and the styles.
HTML Body
Inside the <body></body> tags is where we add the web page content.
The <h2></h2> tags add a heading to the web page. In this case, the “ESP8266 DHT server” text, but you can add any other text.
<h2>ESP8266 DHT Server</h2>Then, there are two paragraphs. One to display the temperature and the other to display the humidity. The paragraphs are delimited by the <p> and </p> tags. The paragraph for the temperature is the following:
<p>
  <i class="fas fa-thermometer-half" style="color:#059e8a;"</i>
  <span class="dht-labels">Temperature</span>
  <span id="temperature">%TEMPERATURE%</span>
  <sup class="units">°C</sup>
</p>
And the paragraph for the humidity is on the following snipet:
<p>
  <i class="fas fa-tint" style="color:#00add6;"></i>
  <span class="dht-labels">Humidity</span>
  <span id="humidity">%HUMIDITY%</span>
  <sup class="units">%</sup>
</p>
The <i> tags display the fontawesome icons.
How to display icons
To chose the icons, go to the Font Awesome Icons website.

Search the icon you’re looking for. For example, “thermometer”.

Click the desired icon. Then, you just need to copy the HTML text provided.
<i class="fas fa-thermometer-half">
To chose the color, you just need to pass the style parameter with the color in hexadecimal, as follows:
<i class="fas fa-tint" style="color:#00add6;"></i> Proceeding with the HTML text…
The next line writes the word “Temperature” into the web page.
<span class="dht-labels">Temperature</span>The TEMPERATURE text between % signs is a placeholder for the temperature value.
<span id="temperature">%TEMPERATURE%</span>This means that this %TEMPERATURE% text is like a variable that will be replaced by the actual temperature value from the DHT sensor. The placeholders on the HTML text should go between % signs.
Finally, we add the degree symbol.
<sup class="units">°C</sup>The <sup></sup> tags make the text superscript.
We use the same approach for the humidity paragraph, but it uses a different icon and the %HUMIDITY% placeholder.
<p>
  <i class="fas fa-tint" style="color:#00add6;"></i>
  <span class="dht-labels">Humidity</span>
  <span id="humidity">%HUMIDITY%</span>
  <sup class="units">%</sup>
</p>
Automatic Updates
Finally, there’s some JavaScript code in our web page that updates the temperature and humidity automatically, every 10 seconds.
Scripts in HTML text should go between the <script></script> tags.
<script>
setInterval(function ( ) {
  var xhttp = new XMLHttpRequest();
  xhttp.onreadystatechange = function() {
    if (this.readyState == 4 && this.status == 200) {
      document.getElementById("temperature").innerHTML = this.responseText;
    }
  };
  xhttp.open("GET", "/temperature", true);
  xhttp.send();
}, 10000 ) ;

setInterval(function ( ) {
  var xhttp = new XMLHttpRequest();
  xhttp.onreadystatechange = function() {
    if (this.readyState == 4 && this.status == 200) {
      document.getElementById("humidity").innerHTML = this.responseText;
    }
  };
  xhttp.open("GET", "/humidity", true);
  xhttp.send();
}, 10000 ) ;
</script>
To update the temperature on the background, we have a setInterval() function that runs every 10 seconds.
Basically, it makes a request in the /temperature URL to get the latest temperature reading.
  xhttp.open("GET", "/temperature", true);
  xhttp.send();
}, 10000 ) ;
When it receives that value, it updates the HTML element whose id is temperature.
if (this.readyState == 4 && this.status == 200) {
  document.getElementById("temperature").innerHTML = this.responseText;
}
In summary, this previous section is responsible for updating the temperature asynchronously. The same process is repeated for the humidity readings.
Important: since the DHT sensor is quite slow getting the readings, if you plan to have multiple clients connected to an ESP8266 at the same time, we recommend increasing the request interval or remove the automatic updates.
Processor
Now, we need to create the processor() function, that will replace the placeholders in our HTML text with the actual temperature and humidity values.
String processor(const String& var){
  //Serial.println(var);
  if(var == "TEMPERATURE"){
    return String(t);
  }
  else if(var == "HUMIDITY"){
    return String(h);
  }
  return String();
}
When the web page is requested, we check if the HTML has any placeholders. If it finds the %TEMPERATURE% placeholder, we return the temperature that is stored on the t variable.
if(var == "TEMPERATURE"){
  return String(t);
}
If the placeholder is %HUMIDITY%, we return the humidity value.
else if(var == "HUMIDITY"){
  return String(h);
}
setup()
In the setup(), initialize the Serial Monitor for debugging purposes.
Serial.begin(115200);Initialize the DHT sensor.
dht.begin();Connect to your local network and print the ESP8266 IP address.
WiFi.begin(ssid, password);
while (WiFi.status() != WL_CONNECTED) {
  delay(1000);
  Serial.println("Connecting to WiFi..");
}
Finally, add the next lines of code to handle the web server.
server.on("/", HTTP_GET, [](AsyncWebServerRequest *request){
  request->send_P(200, "text/html", index_html, processor);
});
server.on("/temperature", HTTP_GET, [](AsyncWebServerRequest *request){
  request->send_P(200, "text/plain", String(t).c_str());
});
server.on("/humidity", HTTP_GET, [](AsyncWebServerRequest *request){
  request->send_P(200, "text/plain", String(h).c_str());
});
When we make a request on the root URL, we send the HTML text that is stored on the index_html variable. We also need to pass the processorfunction, that will replace all the placeholders with the right values.
server.on("/", HTTP_GET, [](AsyncWebServerRequest *request){
  request->send_P(200, "text/html", index_html, processor);
});
We need to add two additional handlers to update the temperature and humidity readings. When we receive a request on the /temperature URL, we simply need to send the updated temperature value. It is plain text, and it should be sent as a char, so, we use the c_str() method.
server.on("/temperature", HTTP_GET, [](AsyncWebServerRequest *request){
  request->send_P(200, "text/plain", String(t).c_str());
});
The same process is repeated for the humidity.
server.on("/humidity", HTTP_GET, [](AsyncWebServerRequest *request){
  request->send_P(200, "text/plain", String(h).c_str());
});
Lastly, we can start the server.
server.begin();In the loop() is where we get new temperature readings from the sensor every 10 seconds.
Basically, we check if it is time to get new sensor readings:
if (currentMillis - previousMillis >= interval) {If it is, we store a new temperature reading on the newT variable
float newT = dht.readTemperature();If the newT variable is a valid temperature readings, we update the t variable.
else {
  t = newT;
  Serial.println(t);
}
The same process is repeated for the humidity.
// Read Humidity
float newH = dht.readHumidity();
// if humidity read failed, don't change h value
if (isnan(newH)) {
   Serial.println("Failed to read from DHT sensor!");
}
else {
  h = newH;
  Serial.println(h);
}
That’s pretty much how the code works.
Uploading the code
After modifying the sketch with the necessary changes, if needed, upload the code to your ESP8266 (if you can’t upload code to your ESP8266, read this troubleshooting guide).
Make sure you have the right board and COM port select. Go to Tools> Board and select the ESP8266 model you’re using. In our case, we’re using the ESP8266 12-E NodeMCU Kit.

Go to Tools > Port and select the COM port the ESP8266 is connected to.

Press the Arduino IDE upload button.
Note: if you’re using an ESP-01, you need a serial adapter or an FTDI programmer to upload code.
ESP8266 IP Address
After uploading the code, open the Serial Monitor at a baud rate of 115200. Press the ESP8266 reset button. The ESP8266 IP address will be printed in the serial monitor as shown in the following figure.

Demonstration
In your local network, go to a browser and type the ESP8266 IP address. It should display the following web page with the latest sensor readings.