Google Spreadsheet or Google Sheets with ESP8266 Nodemcu for Data Logging, Temp & Hum DHT11- So far I have covered majority of the IoT platforms for monitoring different types of sensors and for controlling different types of electrical devices. Usually for the real-time sensors monitoring I display the sensors values on the Gauges and for this I mostly use Blynk IoT platform, Ubidots, and Thingspeak etc. In majority of the cases only displaying the sensor values is not enough. There are guys who are interested in the data logging for the post analysis. The sensors data logging service offered by majority of the IoT platforms isn’t as impressive as offered by the Google which is absolutely free, highly secured, fast, and reliable. In this article, I will be using Nodemcu ESP8266 WiFi module with Google Sheets for the sensor data logging. Google Sheets is a spreadsheet program included as part of the free, web-based Google Docs Editors suite offered by Google.
Read my latest Article on How to send data from Google Spreadsheet to ESP8266 or ESP32.
Since this is my first time using the Google sheets for the Sensors data logging; so, I will try my level best to explain each and every detail. I will be using DHT11 Temperature and Humidity sensor as this is the most basic and easily available sensor. Once you learn how to send the temperature and humidity values to the Google Spreadsheet then you can replace this sensor with any other sensor of your choice. So, before, I am going to explain the circuit diagram, programming, and how to get started with the Google sheets, first let me explain; how this projects works.
I am using my homemade 4S lithium Ion battery pack for powering up my Nodemcu ESP8266 Development board. Read my article on how to make 3S and 4S lithium Ion batteries pack, if you want to make the same battery pack. As soon as I powered my Nodemcu ESP8266 module, after a few seconds I started to receive the data. The temperature and humidity values are stored along with the date and time information. For the demonstration purposes I am using a short delay in the programming, if you want you can increase the delay time. It’s totally up to you whether you want to send data after every 1 minute or 10 minutes, or 1 hour.
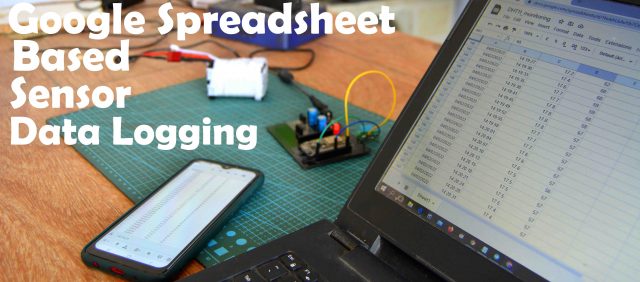
Anyways, you can also open the Google spreadsheet using your laptop or computer; again it’s up to you whether you want to use your computer or your cell phone for the monitoring and post analysis. Since this is an IoT based project so, you can monitor the temperature and humidity values from anywhere in the world. One thing that I really liked about the Google sheets is that; if you share the same Google account with multiple users then all the users can monitor the same sensor from anywhere in the world.
Amazon Links:
DHT11 Temperature and Humidity Module:
Other Tools and Components:
Super Starter kit for Beginners
PCB small portable drill machines
*Please Note: These are affiliate links. I may make a commission if you buy the components through these links. I would appreciate your support in this way!
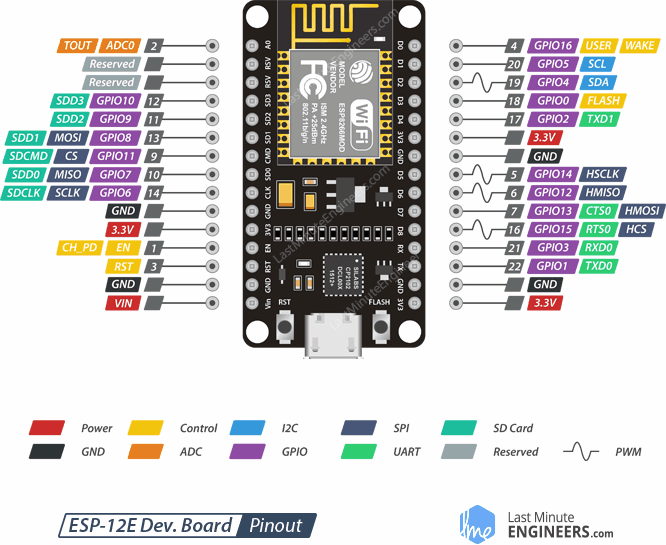
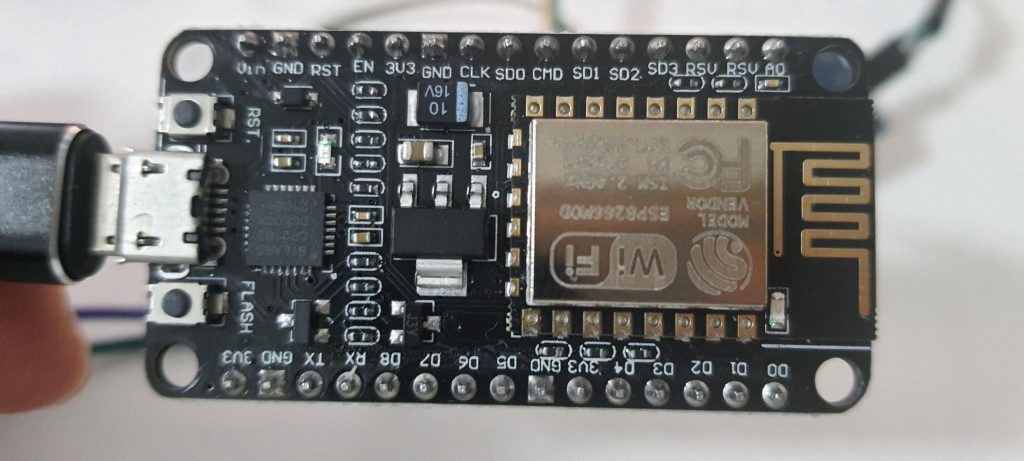
ESP8266 NodeMCU:
Download –> CP210x driver for NodeMCU V2 ,ESP32
ESP8266 is a highly integrated chip designed for the needs of a new connected world. It offers a complete and self-contained Wi-Fi networking solution, allowing it to either host the application or to offload all Wi-Fi networking functions from another application processor.
ESP8266 has powerful on-board processing and storage capabilities that allow it to be integrated with the sensors and other application specific devices through its GPIOs with minimal development up-front and minimal loading during runtime. Its high degree of on-chip integration allows for minimal external circuitry, and the entire solution, including front-end module, is designed to occupy minimal PCB area.
Specifications:
Serial/UART baud rate: 115200 bps
Input power: 3.3V
I/O voltage tolerance: 3.6V Max
Flash Memory Size: 1MB (8Mbit)
WiFi security modes: WPA, WPA2
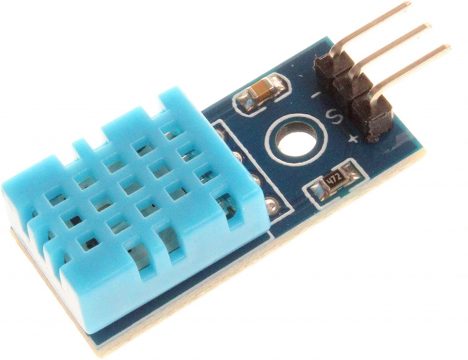
DHT11 Sensor:
- DHT11 digital temperature and humidity sensor is a digital signal output with a calibrated temperature and humidity combined sensor.
- It uses a dedicated digital modules and acquisition of temperature and humidity sensor technology to ensure that products with high reliability and excellent long term stability.
- Sensor consists of a resistive element and a sense of wet NTC temperature measurement devices, and with a high-performance 8-bit microcontroller connected.
- The product has excellent quality, fast response, anti-interference ability, high cost and other advantages.
The single-wire wiring scheme makes it easy to be integrated to other applications and the simple communication protocol greatly reduces the programming effort required.
Nodemcu ESP8266 and DHT11 Circuit Diagram:
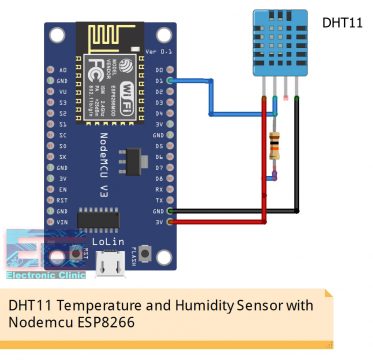
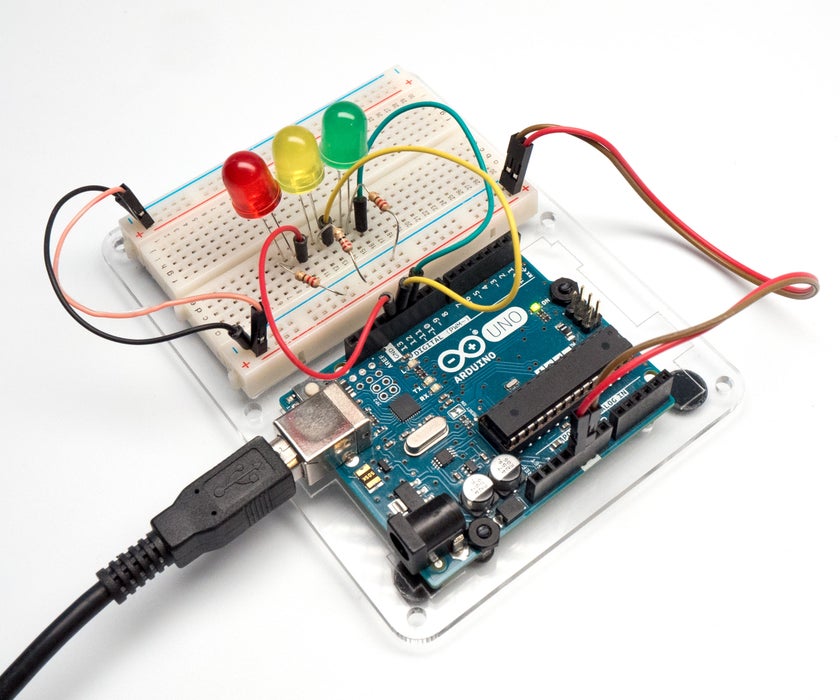
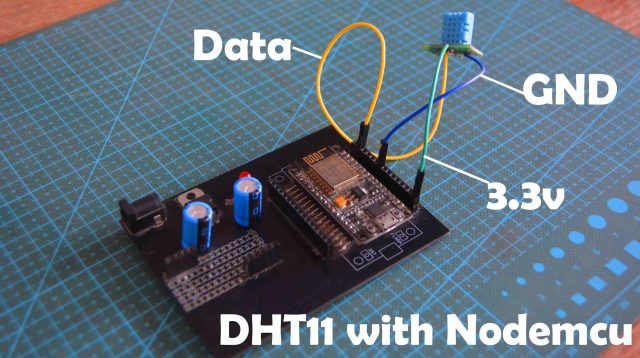
If you are just getting started with the Nodemcu ESP8266 and DHT11 Temperature and Humidity sensor then these are the minimal connections which you will need for this project. You can power up your Nodemcu module using your laptop. Connect the VCC and GND pins of the DHT11 sensor with the 3.3V and GND pins of the Nodemcu Module; and connect the Data pin of the dht11 sensor with the digital pin D1 of the Nodemcu module. Don’t forget to add a 10k ohm resistor between the VCC and Data pins of the DHT11 sensor. Now, let’s take a look at the other circuit diagram.
Nodemcu esp8266 power supply Circuit Diagram:
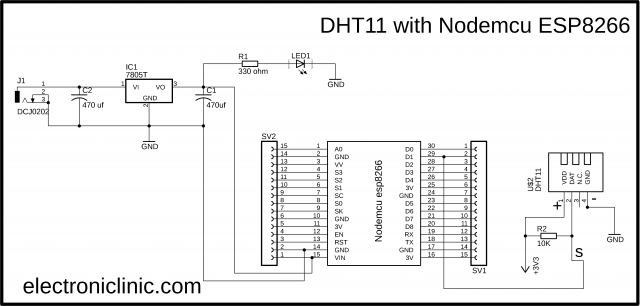
This circuit diagram is for those guys who want to power up the Nodemcu module using an external power supply. As you can see the DHT11 sensor connections with the Nodemcu ESP8266 WiFi module remains exactly the same. On the left side is the regulated 5v power supply which is based on the 7805 voltage regulator. J1 is the DC female power jack and this is where we connect a 12v adaptor, battery, or a solar panel. Don’t forget to add these 470uF decoupling capacitors.
Here is my Nodemcu ESP8266 WiFi module based development board which I use for testing my IoT based projects. If you want to make the same development board then you can read my previous article. Anyways, I interfaced my DHT11 sensor with the Nodemcu module as per the circuit diagram. My connections are completed and now let’s start with the Google sheets, there is nothing complicated just follow the same exact steps.
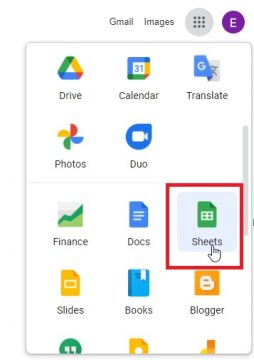
First of all we will create the Google Spreadsheet for which we will click on the Google apps and in which we will click on the Sheets.
After that we will click on the blank in order to create a new spreadsheet.

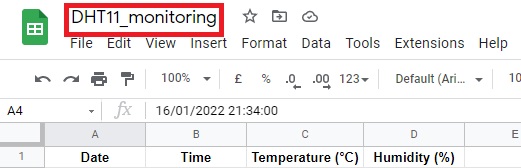
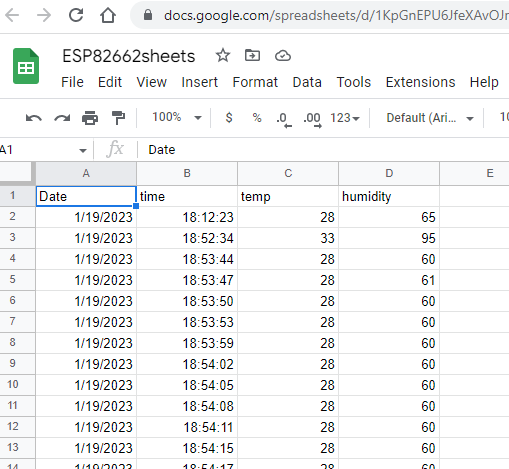
After that we will give the title name of the project and then in columns we will write the date, time, temperature, and humidity.
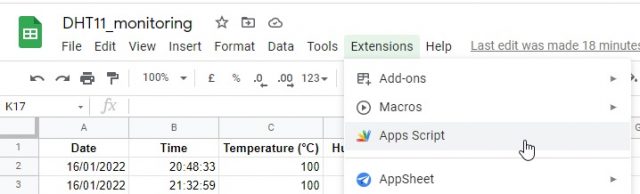
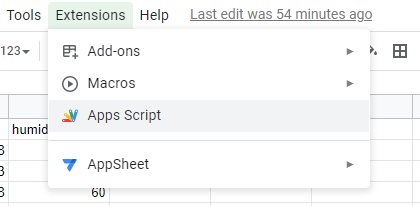
In the date column which is “A” we will receive the date, in column “B” we will receive the time, in column “C” we will receive the temperature, and in the column “D” we will receive the humidity. After that we will open the script editor in the previous versions of spread sheet it was found in the tools but in the new versions of the spread sheet it is in the extensions with the name Apps Script click on it.
After that we will click on the untitled project and give the name to the project which is DHT_monitoring and click on the ok.

function doGet(e) {
  Logger.log( JSON.stringify(e) );
  var result = 'Ok';
  if (e.parameter == 'undefined') {
    result = 'No Parameters';
  }
  else {
    var sheet_id = 'YourGoogleSheetID'; 	// Spreadsheet ID
    var sheet = SpreadsheetApp.openById(sheet_id).getActiveSheet();
    var newRow = sheet.getLastRow() + 1;
    var rowData = [];
    var Curr_Date = new Date();
    rowData[0] = Curr_Date; // Date in column A
    var Curr_Time = Utilities.formatDate(Curr_Date, "Asia/Bangkok", 'HH:mm:ss');
    rowData[1] = Curr_Time; // Time in column B
    for (var param in e.parameter) {
      Logger.log('In for loop, param=' + param);
      var value = stripQuotes(e.parameter[param]);
      Logger.log(param + ':' + e.parameter[param]);
      switch (param) {
        case 'temp':
          rowData[2] = value; // Temperature in column C
          result = 'temp Written on column C';
          break;
        case 'humi':
          rowData[3] = value; // Temperature in column D
          result = 'humidity Written on column D';
          break;
      }
    }
    Logger.log(JSON.stringify(rowData));
    var newRange = sheet.getRange(newRow, 1, 1, rowData.length);
    newRange.setValues([rowData]);
  }
  return ContentService.createTextOutput(result);
}
function stripQuotes( value ) {
  return value.replace(/^["']|['"]$/g, "");
}
Google Spreadsheet Nodemcu ESP8266 Code:
#include <ESP8266WiFi.h>
#include <WiFiClientSecure.h>
#include "DHT.h"
//----------------------------------------

#define DHTTYPE DHT11   // DHT 11
//#define DHTTYPE DHT21   // DHT 21 (AM2301)
//#define DHTTYPE DHT22   // DHT 22  (AM2302), AM2321

const int DHTPin = 5;
  String t;
#define ON_Board_LED 2  //--> Defining an On Board LED, used for indicators when the process of connecting to a wifi router

//----------------------------------------SSID dan Password wifi mu gan.
const char* ssid = "Xiaomi 11T"; //--> Nama Wifi / SSID.
const char* password = "12345678"; //-->  Password wifi .
//----------------------------------------

//----------------------------------------Host & httpsPort
const char* host = "script.google.com";
const int httpsPort = 443;
//----------------------------------------
// Initialize DHT sensor.
DHT dht(DHTPin, DHTTYPE);

WiFiClientSecure client; //--> Create a WiFiClientSecure object.

// Timers auxiliar variables
long now = millis();
long lastMeasure = 0;

String GAS_ID = "AKfycbzFBOjYai5SbmGGL6ZI4RFKgfj_0UHd5FZKbchNXiwXpIp2dpV1p8yaPxDJsKc9xjn1XA"; //--> spreadsheet script ID

//============================================ void setup
int analogPin = A0;
int Relay1 = D0;
int soil = 0;

void setup() {
  // put your setup code here, to run once:
  Serial.begin(115200);
  pinMode(Relay1, OUTPUT);
digitalWrite(Relay1, HIGH);

  delay(500);
  dht.begin();

  WiFi.begin(ssid, password); //--> Connect to your WiFi router
  Serial.println("");

  pinMode(ON_Board_LED,OUTPUT); //--> On Board LED port Direction output
  digitalWrite(ON_Board_LED, HIGH); //-->

  //----------------------------------------Wait for connection
  Serial.print("Connecting");
  while (WiFi.status() != WL_CONNECTED) {
    Serial.print(".");
    //----------------------------------------Make the On Board Flashing LED on the process of connecting to the wifi router.
    digitalWrite(ON_Board_LED, LOW);
    delay(250);
    digitalWrite(ON_Board_LED, HIGH);
    delay(250);
    //----------------------------------------
  }
  //----------------------------------------
  digitalWrite(ON_Board_LED, HIGH); //--> Turn off the On Board LED when it is connected to the wifi router.
  //----------------------------------------If successfully connected to the wifi router, the IP Address that will be visited is displayed in the serial monitor
  Serial.println("");
  Serial.print("Successfully connected to : ");
  Serial.println(ssid);
  Serial.print("IP address: ");
  Serial.println(WiFi.localIP());
  Serial.println();
  //----------------------------------------

  client.setInsecure();
}
//==============================================================================
//============================================================================== void loop
void loop() {
soil = analogRead(analogPin);
  now = millis();
  // Publishes new temperature and humidity every 3 seconds
  if (now - lastMeasure > 3000) {
    lastMeasure = now;
    // Sensor readings may also be up to 2 seconds 'old' (its a very slow sensor)
    float h = dht.readHumidity();
    // Read temperature as Celsius (the default)
    float t = dht.readTemperature();
    // Read temperature as Fahrenheit (isFahrenheit = true)
    float f = dht.readTemperature(true);

    // Check if any reads failed and exit early (to try again).
    if (isnan(h) || isnan(t) || isnan(f)) {
      Serial.println("Failed to read from DHT sensor!");
      return;
    }

    // Computes temperature values in Celsius
    float hic = dht.computeHeatIndex(t, h, false);
    static char temperatureTemp[7];
    dtostrf(hic, 6, 2, temperatureTemp);

    // Uncomment to compute temperature values in Fahrenheit
    // float hif = dht.computeHeatIndex(f, h);
    // static char temperatureTemp[7];
    // dtostrf(hif, 6, 2, temperatureTemp);

    static char humidityTemp[7];
    dtostrf(h, 6, 2, humidityTemp);


    Serial.print("Soil: ");
    Serial.print(soil);

    Serial.print("Humidity: ");
    Serial.print(h);
    Serial.print(" %\t Temperature: ");
    Serial.print(t);
    Serial.print(" *C ");
    Serial.print(f);
    Serial.print(" *F\t Heat index: ");
    Serial.print(hic);
    Serial.println(" *C ");
    // Serial.print(hif);
    // Serial.println(" *F");
     sendData(t,h,f);

  }


}
//*****
//==============================================================================

void sendData(float value,float value2,float value3) {
  Serial.println("==========");
  Serial.print("connecting to ");
  Serial.println(host);

  //----------------------------------------Connect to Google host
  if (!client.connect(host, httpsPort)) {
    Serial.println("connection failed");
    return;
  }
  //----------------------------------------

  //----------------------------------------Proses dan kirim data

  float string_temp = value;
  float string_humi = value2;
  float string_soil = value3;
  String url = "/macros/s/" + GAS_ID + "/exec?temp=" + string_temp + "&humi="+string_humi+ "&soil="+string_soil; //  3 variables
  Serial.print("requesting URL: ");
  Serial.println(url);

  client.print(String("GET ") + url + " HTTP/1.1\r\n" +
         "Host: " + host + "\r\n" +
         "User-Agent: BuildFailureDetectorESP8266\r\n" +
         "Connection: close\r\n\r\n");

  Serial.println("request sent");
  //----------------------------------------

  //---------------------------------------
  while (client.connected()) {
    String line = client.readStringUntil('\n');
    if (line == "\r") {
      Serial.println("headers received");
      break;
    }
  }
  String line = client.readStringUntil('\n');
  if (line.startsWith("{\"state\":\"success\"")) {
    Serial.println("esp8266/Arduino CI successfull!");
  } else {
    Serial.println("esp8266/Arduino CI has failed");
  }
  Serial.print("reply was : ");
  Serial.println(line);
  Serial.println("closing connection");
  Serial.println("==========");
  Serial.println();
  //----------------------------------------
  if (soil > 77) {
    digitalWrite(Relay1, LOW);
  }
  else {
    digitalWrite(Relay1, HIGH);
  }
}
Upload the above. Power up your Nodemcu ESP8266 module, next open your spreadsheet App on your cell phone or computer and you should be able to receive the temperature and humidity values along with the date and time information.
#include "DHT.h"
#define DHTPIN D1
#define DHTTYPE DHT11 // DHT 11
//define DHTTYPE DHT22 // DHT 22 (AM2302), AM2321
//#define DHTTYPE DHT21 // DHT 21 (AM2301)
DHT dht(DHTPIN, DHTTYPE);

int Relay1 = D0;

void setup() {
Serial.begin(9600);
Serial.println(F("DHTxx test!"));
dht.begin();

pinMode(Relay1, OUTPUT);
digitalWrite(Relay1, HIGH);

}
void loop() {
delay(2000);
float h = dht.readHumidity();
float t = dht.readTemperature();
float f = dht.readTemperature(true);
if (isnan(h) || isnan(t) || isnan(f)) {
Serial.println(F("Failed to read from DHT sensor!"));
return;
}
float hif = dht.computeHeatIndex(f, h);
float hic = dht.computeHeatIndex(t, h, false);
Serial.print(F("Humidity: "));
Serial.print(h);
Serial.print(F("% Temperature: "));
Serial.print(t);
Serial.print(F(" C "));
Serial.print(f);
Serial.print(F(" F Heat index: "));
Serial.print(hic);
Serial.print(F(" C "));
Serial.print(hif);
Serial.println(F(" F"));
if (t > 25) {
    digitalWrite(Relay1, LOW);
  }
  else {
    digitalWrite(Relay1, HIGH);
  }
}