A simple project to learn IoT by connecting a DHT11 temperature and humidity sensor with WeMos D1 Mini and interfacing the data to Blynk.
Step 1: Install the Software
To Install the Arduino IDE, download from this link: https://www.arduino.cc/en/Main/Software
To Install Blynk, download from Google Play Store.
For board and library:
ESP8266 Board: http://arduino.esp8266.com/stable/package_esp8266com_index.json
DHT11 Library: https://github.com/sarful/DHT_monitoring_In_Blynk_app_Use_NodeMcu/blob/master/DHT%20Library.zip
Simple Timer: https://github.com/jfturcot/SimpleTimer
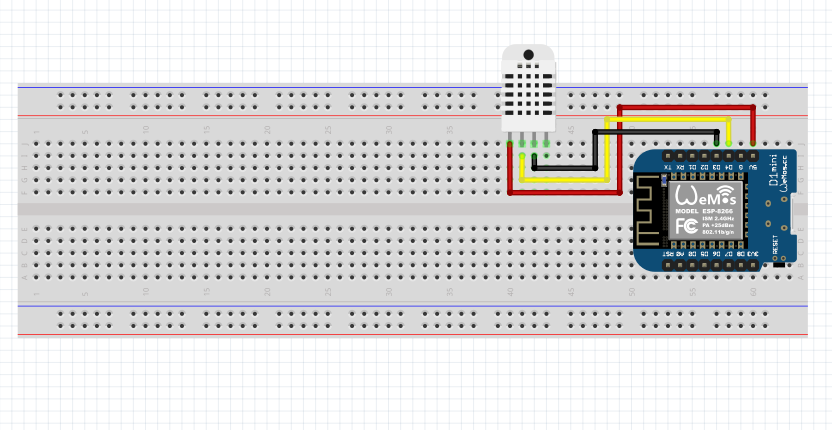
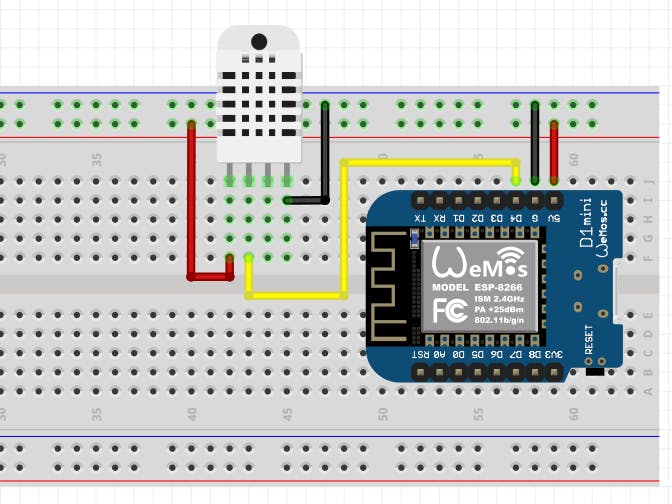
Step 2: Wiring
Connect the wire, the DHT11 has 4 or 3 Pin includes VCC, Data, and Ground pin.
VCC Pin of DHT11 to 5V Pin of WeMos D1 Mini
Data Pin of DHT11 to D4 Pin of WeMos D1 Mini
GND Pin of DHT11 to GND Pin of WeMos D1 Mini
Step 3: Set Up Blynk
After download and installing the Blynk Apps from Google Play Store, you need to make your IoT project apps in Blynk. Here the steps.
- Login to your Blynk App. If you don’t have one, just create it, it’s free
- Create a new project, give your project a name, choose your device : WeMos D1 Mini, connetion type : WiFi
- Then you will receive a notification about Auth Token, just select OK. Your Auth Token wil be sent to your Email
- Then you see your workspace. Go to Widget Box, and select ‘Gauge’. Select the Gauge Widget twice, the first one will be set as the Temperature gauge, the second one will be set as the Humidity gauge.
- After two gauge selected, go to the gauge setting.
For the first gauge:
Name: Temperature
Input: Virtual, V0
Label: °C / °F
Reading Rate: 1 Sec
For the second gauge:
Name: Humidity
Input: Virtual, V1
Label: RH
Reading Rate: 1 Sec
Step 4: Code
Paste the code that i’ve attached, and change the auth code in the program that i’ve attached with your own auth code (check your Email for your auth code).https://www.hackster.io/fattahalf
#define BLYNK_PRINT Serial
#include <ESP8266WiFi.h>
#include <BlynkSimpleEsp8266.h>
#include "DHT.h"
#include <SimpleTimer.h>
#define DHTTYPE DHT11
#define dht_dpin D4
DHT dht(dht_dpin, DHTTYPE);
SimpleTimer timer;
char auth[] = "Your Auth Code";
char ssid[] = "Your WiFI";
char pass[] = "Your Wifi Password";
float t;
float h;

void setup()
{
    Serial.begin(9600);
    Blynk.begin(auth, ssid, pass);
    dht.begin();
    timer.setInterval(2000, sendUptime);
}

void loop()
{
  Blynk.run();
  timer.run();
}

void sendUptime()
{
  float h = dht.readHumidity();
  float t = dht.readTemperature();
  Serial.println("Humidity and temperature\n\n");
  Serial.print("Current humidity = ");
  Serial.print(h);
  Serial.print("%  ");
  Serial.print("temperature = ");
  Serial.print(t);
  Blynk.virtualWrite(V0, t);
  Blynk.virtualWrite(V1, h);
}