DHT11 & DHT22 Sensors Temperature and Humidity Tutorial using Arduino
In this Arduino Tutorial we will learn how to use the DHT11 or the DHT22 sensor for measuring temperature and humidity with the Arduino board. You can watch the following video or read the written tutorial below for more details.
Overview
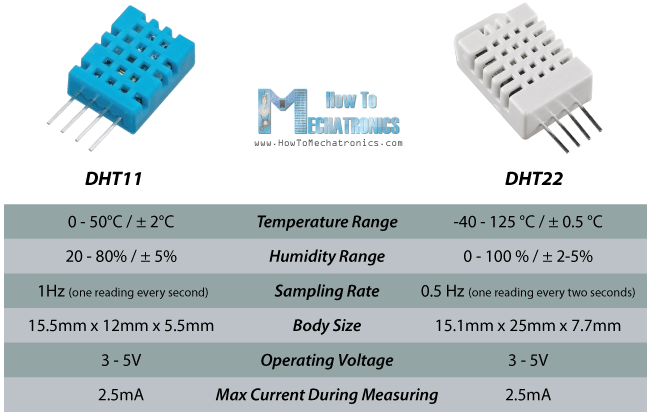
These sensors are very popular for electronics hobbyists because there are very cheap but still providing great performance. Here are the main specifications and differences between these two sensors:
The DHT22 is the more expensive version which obviously has better specifications. Its temperature measuring range is from -40 to +125 degrees Celsius with +-0.5 degrees accuracy, while the DHT11 temperature range is from 0 to 50 degrees Celsius with +-2 degrees accuracy. Also the DHT22 sensor has better humidity measuring range, from 0 to 100% with 2-5% accuracy, while the DHT11 humidity range is from 20 to 80% with 5% accuracy.

There are two specification where the DHT11 is better than the DHT22. That’s the sampling rate which for the DHT11 is 1Hz or one reading every second, while the DHT22 sampling rate is 0,5Hz or one reading every two seconds and also the DHT11 has smaller body size. The operating voltage of both sensors is from 3 to 5 volts, while the max current used when measuring is 2.5mA.
You can get these components from any of the sites below:
- DHT11 Sensor…………………………….. Amazon / Banggood / AliExpress
- DHT22 Sensor……………………………. Amazon / Banggood / AliExpress
- Arduino Board …………………………… Amazon / Banggood / AliExpress
- Breadboard and Jump Wires ……… Amazon / Banggood / AliExpress
DHT11 / DHT22 Working Principle
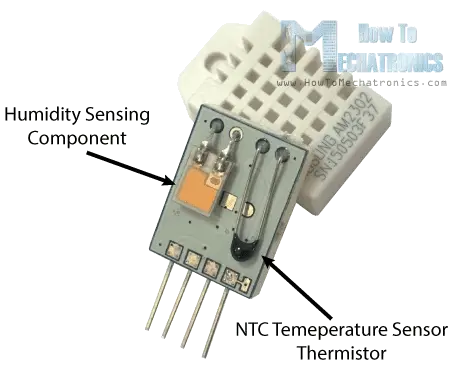
Ok now let’s see how these sensors actually work. They consist of a humidity sensing component, a NTC temperature sensor (or thermistor) and an IC on the back side of the sensor.
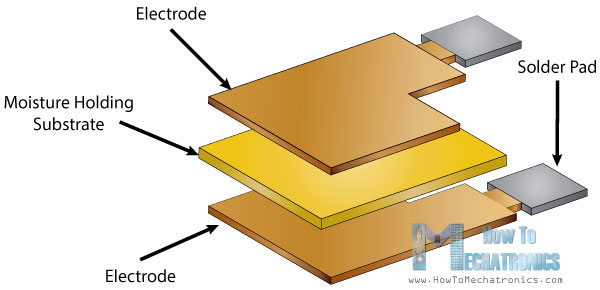
For measuring humidity they use the humidity sensing component which has two electrodes with moisture holding substrate between them. So as the humidity changes, the conductivity of the substrate changes or the resistance between these electrodes changes. This change in resistance is measured and processed by the IC which makes it ready to be read by a microcontroller.
On the other hand, for measuring temperature these sensors use a NTC temperature sensor or a thermistor.
A thermistor is actually a variable resistor that changes its resistance with change of the temperature. These sensors are made by sintering of semiconductive materials such as ceramics or polymers in order to provide larger changes in the resistance with just small changes in temperature.
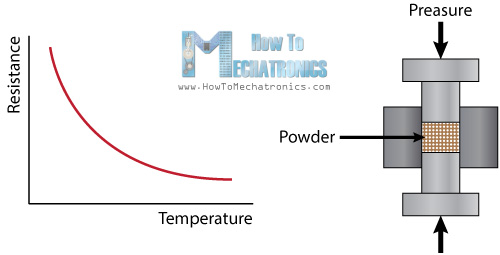
The term “NTC” means “Negative Temperature Coefficient”, which means that the resistance decreases with increase of the temperature.
Circuit Schematics
The DHTxx sensors have four pins, VCC, GND, data pin and a not connected pin which has no usage. A pull-up resistor from 5K to 10K Ohms is required to keep the data line high and in order to enable the communication between the sensor and the Arduino Board. There are some versions of these sensors that come with a breakout boards with built-in pull-up resistor and they have just 3 pins.

The DHTXX sensors have their own single wire protocol used for transferring the data. This protocol requires precise timing and the timing diagrams for getting the data from the sensors can be found from the datasheets of the sensors. However, we don’t have to worry much about these timing diagrams because we will use the DHT library which takes care of everything.
Related tutorial: Learn how to build an Arduino based Wireless Weather Station
Source Code
First we need to included the DHT library which can be found from the Arduino official website, then define the pin number to which our sensor is connected and create a DHT object. In the setup section we need to initiate the serial communication because we will use the serial monitor to print the results. Using the read22() function we will read the data from the sensor and put the values of the temperature and the humidity into the t and h variables. If you use the DHT11 sensor you will need to you the read11() function. At the end we will print the temperature and the humidity values on the serial monitor.
/*  DHT11/ DHT22 Sensor Temperature and Humidity Tutorial
 *  Program made by Dejan Nedelkovski,
 *  www.HowToMechatronics.com
 */
/*
 * You can find the DHT Library from Arduino official website
 * https://playground.arduino.cc/Main/DHTLib
 */

#include <dht.h>

#define dataPin 8 // Defines pin number to which the sensor is connected
dht DHT; // Creats a DHT object

void setup() {
  Serial.begin(9600);
}
void loop() {
  int readData = DHT.read22(dataPin); // Reads the data from the sensor
  float t = DHT.temperature; // Gets the values of the temperature
  float h = DHT.humidity; // Gets the values of the humidity

  // Printing the results on the serial monitor
  Serial.print("Temperature = ");
  Serial.print(t);
  Serial.print(" *C ");
  Serial.print("    Humidity = ");
  Serial.print(h);
  Serial.println(" % ");

  delay(2000); // Delays 2 secods, as the DHT22 sampling rate is 0.5Hz
}
After we will upload this code to the Arduino board, the temperature and humidity results from the sensor can be seen on the Serial monitor.
/*  DHT11/ DHT22 Sensor Temperature and Humidity Tutorial
 *  Program made by Dejan Nedelkovski,
 *  www.HowToMechatronics.com
 */
/*
 * You can find the DHT Library from Arduino official website
 * https://playground.arduino.cc/Main/DHTLib
 */

#include <LiquidCrystal.h> // includes the LiquidCrystal Library
#include <dht.h>


#define dataPin 8
LiquidCrystal lcd(1, 2, 4, 5, 6, 7); // Creates an LCD object. Parameters: (rs, enable, d4, d5, d6, d7)
dht DHT;

void setup() {
  lcd.begin(16,2); // Initializes the interface to the LCD screen, and specifies the dimensions (width and height) of the display
}

void loop() {
  int readData = DHT.read22(dataPin);
  float t = DHT.temperature;
  float h = DHT.humidity;
  lcd.setCursor(0,0); // Sets the location at which subsequent text written to the LCD will be displayed
  lcd.print("Temp.: "); // Prints string "Temp." on the LCD
  lcd.print(t); // Prints the temperature value from the sensor
  lcd.print(" C");
  lcd.setCursor(0,1);
  lcd.print("Humi.: ");
  lcd.print(h);
  lcd.print(" %");
  delay(2000);
}
link:https://howtomechatronics.com/tutorials/arduino/dht11-dht22-sensors-temperature-and-humidity-tutorial-using-arduino/